
Welcome guys! We’re thrilled to have you here. Whether you’re a seasoned developer or just starting your journey in web development, you’ve come to the right place. Our blog is a hub for all things tech, filled with insightful articles, tutorials, and tips to help you build amazing web apps. So grab a cup of coffee, settle in, and let’s embark on this coding adventure together. Happy coding!”
In the vast landscape of web development, Next.js has emerged as a powerful framework, offering developers a seamless experience in building React applications. Its popularity is not only attributed to its simplicity but also to the efficient way it handles server-side rendering, automatic code splitting, and a hassle-free development experience. However, the journey doesn’t end with creating a Next.js app; it’s equally important to know how to upload and host it on a server.
Understanding Next.js
Next.js is a React-based framework that simplifies the process of building robust and performant web applications. With features like automatic code splitting, server-side rendering, and simplified routing, Next.js has become a favorite among developers for both small projects and large-scale applications.
Setting Up the Development Environment
Before diving into Next.js development, it’s essential to set up the development environment. Ensure Node.js and NPM are installed on your machine, and then use the command line to create a new Next.js app effortlessly.
Structuring a Next.js App
Organizing your Next.js app’s structure is crucial for maintainability and scalability. Understand the purpose of pages, components, and the public directory to keep your codebase clean and organized.
Certainly! Here’s a basic file structure for a Next.js app:
my-nextjs-app/
│
├── pages/
│   ├── index.js
│   └── about.js
│
├── components/
│   ├── Header.js
│   ├── Footer.js
│   └── Button.js
│
├── public/
│   ├── images/
│   │   └── logo.png
│   └── favicon.ico
│
├── styles/
│   ├── global.css
│   └── components/
│       ├── Header.module.css
│       └── Button.module.css
│
├── package.json
├── README.md
└── next.config.js
- pages: This directory contains your application’s routes or pages. Each .js file inside this directory corresponds to a route. For example, index.js represents the homepage, and about.js represents the about page.
- components: This directory contains reusable components used throughout your application. It’s good practice to break down your UI into smaller, reusable components for better maintainability.
- public: This directory contains static assets such as images, fonts, and favicon. Files placed in the public directory can be referenced in your code using / as the root.
- styles: This directory contains your application’s stylesheets. Next.js supports CSS modules by default, which allows scoped styling for your components.
- package.json: This file contains metadata and dependencies for your project.
- README.md: This file contains information about your project, such as how to set it up and use it.
- next.config.js: This file is optional and is used for configuring Next.js. You can use it to customize various aspects of your Next.js app.
Creating a Next.js App
Are you ready to dive into the world of modern web development? With Next.js, creating dynamic and performant web applications becomes a breeze. Let’s walk through the steps to set up your first Next.js app.
Start by opening your terminal and running the following command to generate a new project:
Syntax:
npx create-next-app <your_app_name>
Example:
npx create-next-app my-nextjs-app
This command initialises a new Next.js app named “my-nextjs-app”.
Running a Next.js App in Local Development Server
To run your Next.js app locally, you’ll start a development server that serves your application on your computer. This server provides a real-time preview of your app, allowing you to interact with it as if it were deployed online.
Once the setup is complete, navigate to your project directory using this command:
cd my-nextjs-app
After navigating to your Next.js App, start the development server this command:
npm run dev
Building Components in Next.js
Next.js follows React principles, allowing developers to create reusable components efficiently. Learn how to build and style components, making your Next.js app visually appealing and user-friendly.
Begin by creating a new folder, let’s call it components, in your project directory. Inside this folder, you can create a reusable component. For example, let’s create a simple Button component:
Example:
// components/Button.js
import React from 'react';

const Button = ({ onClick, label }) => {
  return (
    <button onClick={onClick}>
      {label}
    </button>
  );
};

export default Button;
Use the Component in a Page
You can now import and use this component in any of your pages. For instance, in the pages/index.js file:
Example:
// pages/index.js
import React from 'react';
import Button from '../components/Button';

const HomePage = () => {
  const handleClick = () => {
    alert('Button Clicked!');
  };

  return (
    <div>
      <h1>Home Page</h1>
      <Button onClick={handleClick} label="Click me" />
    </div>
  );
};

export default HomePage;
Routing in Next.js
Explore the magic of automatic routing in Next.js, simplifying navigation within your app. Additionally, customize routes to tailor the user experience based on your application’s specific needs.
- Automatic Routes
Next.js automatically generates routes based on the files present in the pages directory. Each .js file inside the pages directory represents a route in your application. For example, if you have pages/index.js, it will be mapped to the root route (/), and pages/about.js will be mapped to the /about route.
index.js: Maps to /.
about.js: Maps to /about
Example:
// pages/index.js
import React from 'react';
import Link from 'next/link';

const HomePage = () => {
  return (
    <div>
      <h1>Home Page</h1>
      {/* Custom link to the About page */}
      <Link href="/about">
        <a>About Page</a>
      </Link>
    </div>
  );
};

export default HomePage;- Customizing Routes
You can customize routes in Next.js using dynamic routes and nested routes. Dynamic routes allow you to handle dynamic content by defining a file using square brackets (e.g., [id].js), which can then be accessed via router. query in your page component.
Nested routes can be achieved by creating a directory with the same name as the parent route and placing child route files inside it. For example, to create a nested route /products/:id, you can create a directory named products within the pages directory and place a file named [id].js inside it.
Example:
// pages/products/[id].js
import { useRouter } from 'next/router';

const Product = () => {
    const router = useRouter();
    const { id } = router.query;

    return (
        <div>
            <h1>Product Details</h1>
            <p>ID: {id}</p>
        </div>
    );
};

export default Product;
Adding Functionality with API Routes
Discover the power of API routes in Next.js for creating serverless functions. This feature enables dynamic content generation and interaction with databases, enhancing your app’s functionality.
API routes in Next.js are special files placed inside the pages/api directory. These files handle incoming HTTP requests and can perform various operations like fetching data from a database, processing form submissions, or integrating with third-party services.
Example:
// Creating API Route
// pages/api/products.js
const products = [
    { id: 1, name: 'Product 1', price: 10 },
    { id: 2, name: 'Product 2', price: 20 },
    { id: 3, name: 'Product 3', price: 30 },
];

export default function handler(req, res) {
    // Handle GET request
    if (req.method === 'GET') {
        res.status(200).json(products);
    } else {
        // Handle other HTTP methods
        res.status(405).end(); // Method Not Allowed
    }
}

// Accessing the API
// pages/index.js
import React, { useEffect, useState } from 'react';

const Home = () => {
    const [products, setProducts] = useState([]);

    useEffect(() => {
        // Fetch data from API endpoint
        fetch('/api/products')
            .then(response => response.json())
            .then(data => setProducts(data))
            .catch(error => console.error('Error fetching products:', error));
    }, []);

    return (
        <div>
            <h1>Products</h1>
            <ul>
                {products.map(product => (
                    <li key={product.id}>
                        {product.name} - ${product.price}
                    </li>
                ))}
            </ul>
        </div>
    );
};

export default Home;
Styling in Next.js
Effective styling plays a pivotal role in shaping the overall aesthetics and user experience of a web application. Learn about the styling options available in Next.js and how CSS-in-JS libraries seamlessly integrate with the framework.
Optimizing Next.js App for Production
Ensure your Next.js app performs optimally in a production environment by minimizing and compressing assets. Explore the benefits of server-side rendering for enhanced speed and user experience.
Hosting Options for Next.js Apps
Once your Next.js app is ready, the next step is deploying it on a server. Compare different hosting platforms and follow a step-by-step guide to upload and host your app successfully.
Here’s a description along with an example for hosting a Next.js app using Vercel.
That’s why Vercel:
Vercel provides an intuitive platform for deploying Next.js apps with built-in support for features like serverless functions, automatic scaling, and continuous deployment. It seamlessly integrates with version control systems like Git, making the deployment process simple and efficient.
Deploying a Next.js app to Vercel from GitHub involves linking your GitHub repository to Vercel and configuring deployment settings. Once set up, Vercel automatically builds and deploys your app whenever changes are pushed to the linked repository.
Steps:
- Sign Up/Login to Vercel:
- If you don’t have a Vercel account, sign up at vercel.com/signup.
- If you already have an account, log in to your Vercel account.
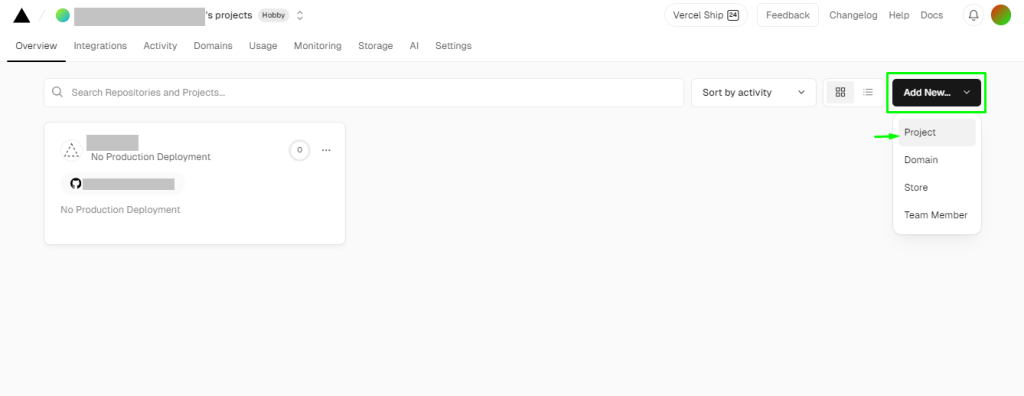
- Connect GitHub Repository:
- In the Vercel dashboard, click on the “Add New” button. And select the project from that dropdown. Then you will be redirected to another page for further configuration.
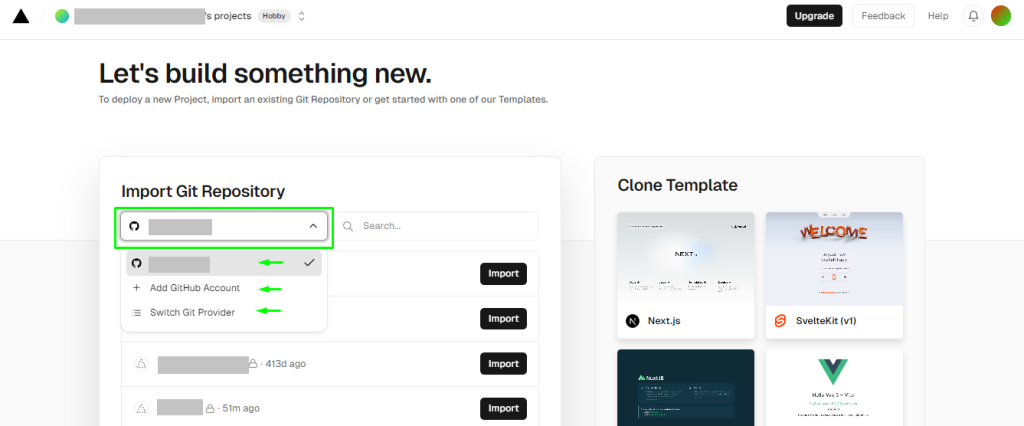
- Select “Import Git Repository” and choose your Next.js project’s GitHub repository.
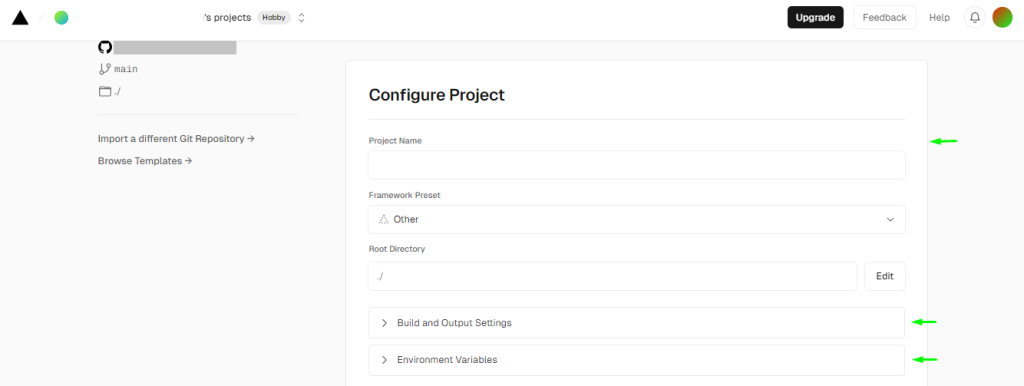
- Configure Deployment Settings:
- Vercel will detect your Next.js app and provide default settings for deployment.
- Review and customize deployment settings such as build and output settings, environment variables, etc as needed.
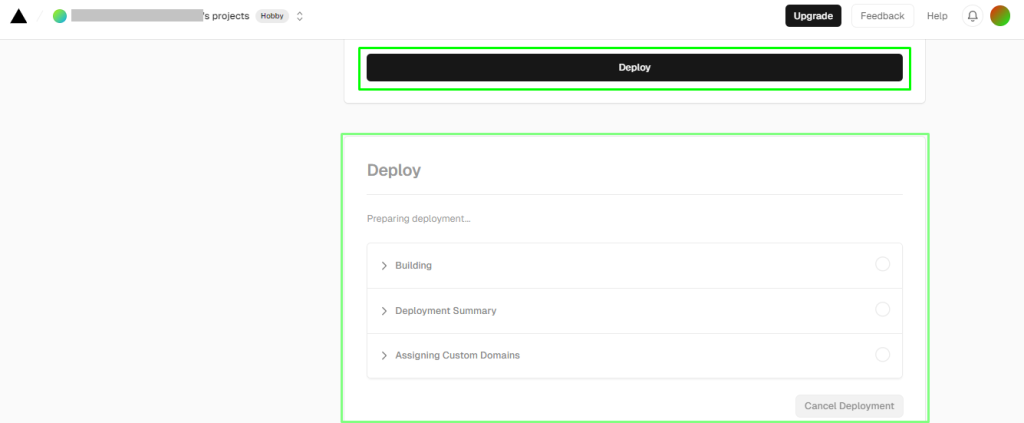
- Deploy Your App:
- Once you’ve configured deployment settings, click on the “Deploy” button to deploy your Next.js app to Vercel.
- Vercel will initiate the deployment process and build your app based on the specified settings.
Troubleshooting Common Issues
Web development is not without its challenges. Address common problems that may arise during the deployment of Next.js applications and gain insights into effective debugging techniques.
Security Considerations
Prioritize the security of your Next.js app by implementing best practices. Understand common vulnerabilities and learn how to safeguard your application from potential threats.
Future-proofing Your Next.js App
Stay ahead in the ever-evolving web development landscape by keeping your Next.js app up-to-date. Regularly check for updates, and ensure your app aligns with the latest industry standards.
Real-world Examples
Draw inspiration from successful Next.js applications. Explore their development and deployment processes to gain valuable insights for your own projects.
Conclusion
In conclusion, creating a Next.js app is just the beginning of an exciting journey. By understanding the framework, structuring your app effectively, and mastering the deployment process, you set the stage for a successful web application. Start your Next.js adventure today, and witness the seamless integration of development and hosting.