In this article you will learn how to use redux store in your react app.
What is Redux?
Redux is the most popular global state management library for react by far. It eliminates the problem of prop-drilling and lets us manage the application state in a scalable way.
Here is how we can add redux while creating react app
# Redux + Plain JS template
npx create-react-app my-app --template redux

# Redux + TypeScript template
npx create-react-app my-app --template redux-typescript
Or if you want to add redux in existing app
# If you use npm:
npm install react-redux

# Or if you use Yarn:
yarn add react-redux
Directory Structure
here we will use the common directory structure to manage redux files in one folder only so you can better understand and of course, after you get a proper understanding of using redux codes you can spread directory structure as per your app needs.
src
--index.js
--todo
----TodoList.jsx
----AddTodo.jsx
----TodoItem.jsx
----todolist.module.css
--redux
----store.js
----rootReducer.js
----todo
------todo.reducer.js
------todo.actions.js
------todo.types.js
Setup Redux Store
here is simple example for creating store for redux.
 /*--- ./src/redux/rootReducer.js ---*/
import { combineReducers } from 'redux';
import todoReducer from './todo/todo.reducer';

const rootReducer = combineReducers({
  todo: todoReducer,
});

export default rootReducer;
Here combineReducers function is used for merge multiple reducers into one store.
/*---- ./src/redux/store.js --- */
import { createStore } from 'redux';
import rootReducer from './rootReducer';

const store = createStore(rootReducer);

export default store;
Add provider from redux to our app
/*--- src/index.js ---*/
import React from 'react';
import ReactDOM from 'react-dom';
import './index.css';
import App from './App';

// REDUX
import { Provider } from 'react-redux';
import store from './redux/store';

ReactDOM.render(
  <React.StrictMode>
    <Provider store={store}>
      <App />
    </Provider>
  </React.StrictMode>,
  document.getElementById('root'),
 );
here Provider is a component from react-redux library. It wraps around our component and it also takes a prop called store (which is our redux store).
Apply use of Reducers, Actions
as you can see in folder structure we have 3 files, each has separate combined use for store and retrieve data from store.
/*---- ./src/redux/todo/todo.types.js ----*/
export const ADD_TODO = 'ADD_TODO';
export const REMOVE_TODO = 'REMOVE_TODO';
export const UPDATE_TODO = 'UPDATE_TODO';
…types files will export constants variables that can be reuse in multiple files.
/*---- ./src/redux/todo/todo.actions.js ----*/
import { ADD_TODO, REMOVE_TODO, UPDATE_TODO } from './todo.types';

export const insertTodoItem = (item) => {
  return {
    type: ADD_TODO,
    payload: item
  };
};

export const removeTodoItem = (item) => {
  return {
    type: REMOVE_TODO,
    payload: item
  };
};

export const updateTodoItem = (id,item) => {
  return {
    type: UPDATE_TODO,
    payload: {id: id, item: item}
  };
};
actions file will export function that will help connection from frontend action to reducers actions. means that function from this file will call from frontend and based on type parameter reducer will define which action will be performed.
/*---- ./src/redux/todo/todo.reducer.js ----*/
import { ADD_TODO, REMOVE_TODO, UPDATE_TODO } from "./todo.types";
const INITIAL_STATE = {
  todoList: [],
};

const todoReducer = (state = INITIAL_STATE, action) => {
  switch (action.type) {
    case ADD_TODO:
      const lastId = new Date().valueOf();
      return {
          ...state,
          todoList: [
              ...state.todoList,
              { id: lastId, name: action.payload, status: "new" },
            ],
        };
        case REMOVE_TODO:
        console.log("add action", action);
      return {
        ...state,
        todoList: [
          ...state.todoList.filter(
            (todoitem) => todoitem.id !== action.payload.id
          ),
        ],
      };
    case UPDATE_TODO:
      return {
        ...state,
        todoList: [
          ...state.todoList.map((todoitem) =>
            todoitem.id === action.payload.id ? action.payload.item : todoitem
          ),
        ],
      };
    default:
      return state;
  }
};

export default todoReducer;
Here in reducer file will handle state variable and perform particular action whenever any action will fire based on action types.
Add frontend components and call redux events
So now we have created required code files for setup redux, let’s add some frontend code from where redux states will be used. so here we will create one component for show list of todo, one form for add new todo, and item component that will called in loop of todo list.
import React from 'react';
import ReactDOM from 'react-dom';
import './index.css';
import App from './App';
import store from './redux/store';
import { Provider } from 'react-redux';
import * as serviceWorker from './serviceWorker';

ReactDOM.render(
  <React.StrictMode>
    <Provider store={store}>
      <App />
    </Provider>
  </React.StrictMode>,
  document.getElementById('root')
);

serviceWorker.unregister();
Provider is used to wrap components that will use our stats and it will have store attribute that will have our previously created store. outside this provider we will not able to use any state variable or actions. if you need guide for creating component you can go through one of our previous blog https://gvtechnolab.in/create-components-in-react-js-web-app/
/* ---- src/todo/TodoList.jsx ---*/
import React, { useState } from "react";
import { useSelector, useDispatch } from "react-redux";
import AddTodo from "./AddTodo";
import TodoItem from "./TodoItem";

import styles from "./todolist.module.css";

export function TodoList() {
  const list = useSelector((state) => state.todo.todoList);

  return (
    <div className={styles.listwrap}>
      <div className="h3">Todos</div>
      <AddTodo />
      <div className={styles.todolistwrap}>
        {list?.length > 0
          ? list?.map((item, index) => {
              return <TodoItem key={index} item={item} />;
            })
          : "No Todos available"}
      </div>
    </div>
  );
}

export default TodoList;
useSelectore is hook from react redux, this hook will get function as parameter and it will return whatever things will return in parameter function.
so here we have todo variable from rootRedurcer.js file and inside that we have todoList from todo.reducer.js file
/*---- src/todo/TodoItem.jsx --- */
import React from "react";
import { useDispatch } from "react-redux";
import { removeTodoItem, updateTodoItem } from "../redux/todo/todo.actions";

import styles from "./todolist.module.css";

export function TodoItem(props) {
  const dispatch = useDispatch();
  const onCheckboxChange = (e) => {
    let status = "new";
    if (e?.target?.checked) {
      status = "complete";
    }
    dispatch(
      updateTodoItem(props?.item?.id, { ...props?.item, status: status })
    );
  };
  return (
    <div className={styles.itemWrap}>
      <input
        type="checkbox"
        id={props?.item?.id}
        value={props?.item?.id}
        checked={props?.item?.status === "complete"}
        onChange={onCheckboxChange}
      />
      <span className={`${styles.todoname} ${props?.item?.status === 'complete' ? styles.completed : ''}`}>{props.item.name}</span>
      <button
        type="button"
        onClick={(e) => {
          if (window.confirm("are you sure to remove?")) {
            dispatch(removeTodoItem(props.item));
          }
        }}
      >
        Remove
      </button>
    </div>
  );
}

export default TodoItem;
Here we have every items with checkbox for complete task, a name of task and remove CTA for remove task item from todo list.
On changing state of checkbox we are calling redux action for update data in list and useDispatch hook is helping us to perform action of redux from our frontend component event call. first import function from todo.actions.js file and then pass it to dispatch method so it will pass event to reducer.
/*---- src/todo/AddTodo.jsx ----*/
import React, { useState } from "react";
import { useDispatch } from "react-redux";
import { insertTodoItem } from "../redux/todo/todo.actions";

import styles from "./todolist.module.css";

export function AddTodo() {
  const dispatch = useDispatch();
  const [newTodo, setNewTodo] = useState("");
  const onAddNew = (e) => {
    e.preventDefault();
    if (newTodo.trim() !== "") {
      dispatch(insertTodoItem(newTodo));
      setNewTodo("");
    }
  };

  return (
    <div className={styles.formwrap}>
      <form onSubmit={onAddNew}>
        <input
          type="text"
          placeholder="add New Todo"
          value={newTodo}
          onChange={(e) => setNewTodo(e.target.value)}
        />
        <button onClick={onAddNew}>Add</button>
      </form>
    </div>
  );
}

export default AddTodo;
Here is the same process, we have added one form with input when the user submits the form we have dispatch event of reducer to add a new item into a todo list.
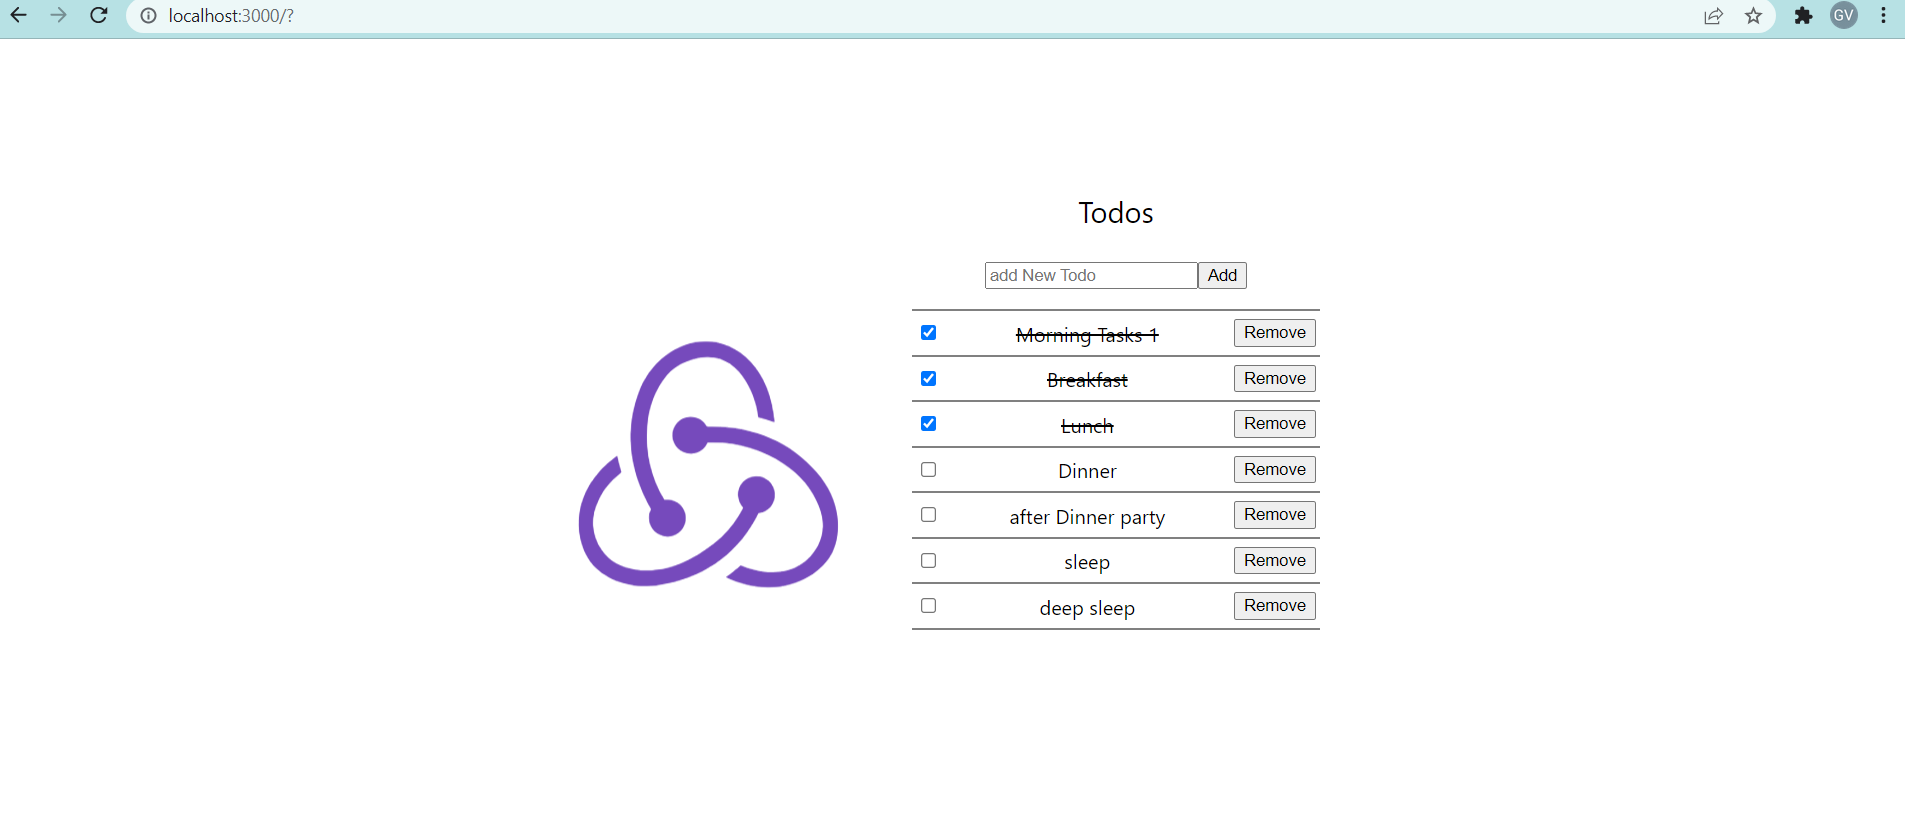
What we will get after this codes
as an output, we will have a list of todo from the redux store, with the form for adding todo items to the list, every item will have the checkbox for marking the task as complete/incomplete, a remove button for remove task item from the list.
Quick Summary process for redux flow of work
- dispatch action from frontend user action,
- action file will return type and parameters based on requirement,
- based on type reducer will perform particular event or state changes,
- on state changes will pass changes wherever the state is used (on every components)
- as it’s global to providers scope it will have changes to every components inside provider.
That’s it you have success fully integrated redux functionality. here we have set simple flow of redux and it can be expandable as per requirement and usability. here you can find full source code for todo example. enjoy coding.