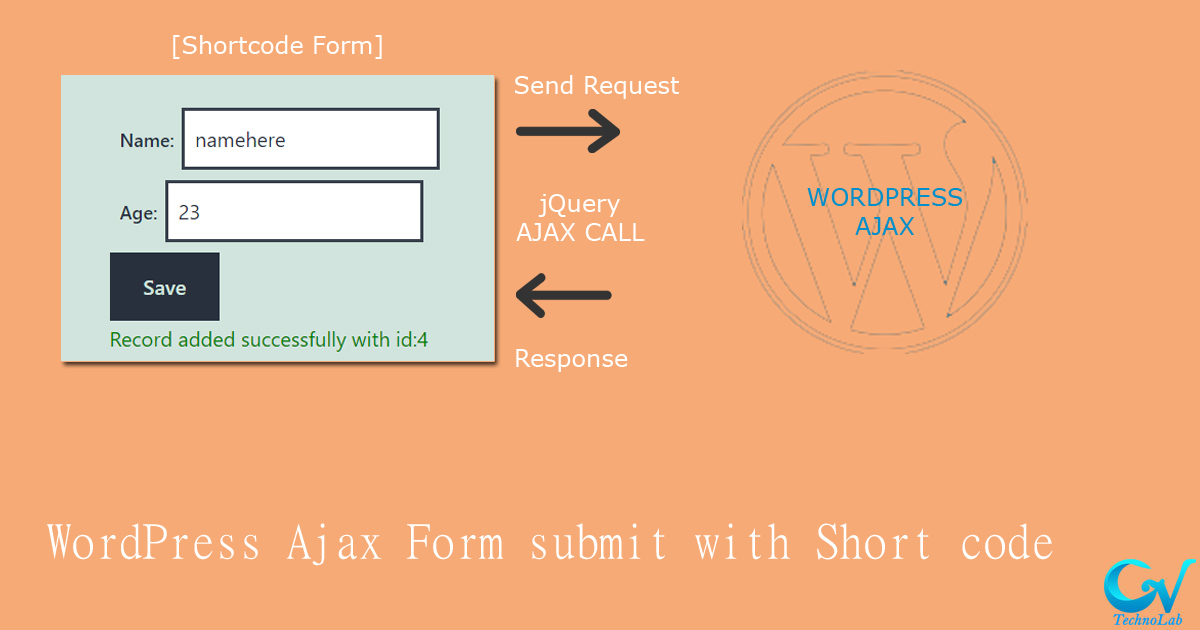
In this post You will learn, how we can create form using short code and send it’s data to database using ajax call. let’s move to learn WordPress Ajax Form and submit data to database with Short code Step by step.
Step 1: Create Short code
On the first step we need a short code which will show form to frontend. and we can create short code by action called add_shortcode. you need to add this action to functions file of your active theme/child theme (to learn how to create theme or child theme please refer to our blog How to Create Child Theme WordPress), or you can also add this to your plugin (to know how to create plugin please refer to out blog How to Create Own Plugin in WordPress)
here is code to add short code that will show form to frontend.
add_shortcode(
  'themeprefix_ajax_form_submit', // Slug for short code to use on page to call it
  'themeprefix_ajax_form_content_callback' // call back function name
);
function themeprefix_ajax_form_content_callback($atts) {
  $atts = shortcode_atts( array(
	'note' => '',
  ), $atts);
  ob_start();
  ?>
  	<form id="customer_form" action="" method="POST">
  		<div class="formgroup">
  			<label for="name">Name:</label>
  			<input type="text" id="name" name="name" required />
  		</div>
  		<div class="formgroup">
  			<label for="age">Age:</label>
  			<input type="text" id="age" name="age" required />
  		</div>
  		<div class="formgroup-submit">
  			<button id="customer_form_submit" type="button">Save</button>
  		</div>
  		<div id="response_container"></div>

  	</form>

  <?php
  $content = ob_get_clean();
  return $content;
}
Step2: Add script for ajax call
this will display a form on frontend. now we will add button click action with jQuery code. but for this we need to first verify jQuery library script is loaded or not. if not loaded we can need to load it by using this action hook.
add_action( 'wp_enqueue_scripts', 'themeprefix_ajax_enqueue_script' );
function themeprefix_ajax_enqueue_script(){
	wp_enqueue_script('jquery');
}
and then add script direct to the short code after form tag completed and test if script is working fine by adding console message like below. and check in console of browser if there is still any error you need to resolve it first.
  	<script type="text/javascript">
  		jQuery(document).ready(function(){
  			console.log('Call from shortcode js'); // verify if jquery is working fine
  		});
  	</script>
Step3: Add JQuery Ajax Call
So now let’s add ajax call in our jQuery code
  	<script type="text/javascript">
		jQuery(document).on('click','#customer_form_submit', function (){
			var form = jQuery('#customer_form');
  			jQuery.ajax({
				type: 'POST', // method of form
				url: "<?php echo admin_url('admin-ajax.php'); ?>", // url to the admin ajax file of wordpress
				data: jQuery(form).serialize(), // data or fields to submit
              	datatype: 'json',
				success: function (result) {
					alert(result);
				},
				error: function () {
					alert("error");
				}
			});
		});
  	</script>
Now in WordPress we also need to pass one parameter with body called action that will be identify what action need to perform on that ajax call otherwise it will return error for not found. so add one hidden field inside our form like this.
<input type="hidden" name="action" value="themeprefix_customer_data_save" />
Now on next step you will need to add it’s action callback where you can get data of post and process them. that can be done by action of wordpress wp_ajax_ and wp_ajax_nopriv_.
Step4: Add callback function for ajax
add this to function file or before or after we have added add_shortcode function
add_action( 'wp_ajax_themeprefix_customer_data_save', 'themeprefix_customer_data_save_content_callback' );
// If you want not logged in users to be allowed to use this function as well so another action we will need to add.
add_action( 'wp_ajax_nopriv_themeprefix_customer_data_save', 'themeprefix_customer_data_save_content_callback' );
function themeprefix_customer_data_save_content_callback(){
	print_r($_POST);
	exit;
}
This code will get post data from ajax call, and there is alert added for ajax response. so it will print submitted data in alert box.
isn’t it’s great, now we only need to save that particular data to out database. so let’s first create a table with two columns name, and age and name it customer. you can get SQL file from GitHub repo database
Step5: Save data to Database
After create table let’s add code to save data to this table.
add_action( 'wp_ajax_themeprefix_customer_data_save', 'themeprefix_customer_data_save_content_callback' );
// If you want not logged in users to be allowed to use this function as well so another action we will need to add.
add_action( 'wp_ajax_nopriv_themeprefix_customer_data_save', 'themeprefix_customer_data_save_content_callback' );
function themeprefix_customer_data_save_content_callback(){
  $returnArray = array('status' => false);
	if($_POST['name'] != '' && $_POST['age'] != ''){
		global $wpdb;
		$tablename = 'customer';//$wpdb->prefix.'customer';
		$wpdb->insert( $tablename, array(
				'name' => $_POST['name'],
				'age' => $_POST['age']),
				array( '%s', '%s')
			);
		$id = $wpdb->insert_id;
		$returnArray = array('status' => true, 'message' => "Record added successfully with id:".$id);
	}else{
		$returnArray = array('status' => false, 'message' => "One or more field required.");
	}
	wp_send_json($returnArray);
	exit;
}
Note: For table name we should add wp prefix for best practice.
So now this code will save submitted data to database table and return success message with id of that record.
Step6: manage response messages
To show response message to the user, using ajax response function so let’s change that code like this.
<script type="text/javascript">
  jQuery(document).ready(function(){
    console.log('Call from shortcode js');
  });
  jQuery(document).on('click','#customer_form_submit', function (){
    var form = jQuery('#customer_form');
    jQuery('#response_container').empty();
    jQuery.ajax({
      type: 'POST',
      url: '<?php echo admin_url('admin-ajax.php'); ?>',
      data: jQuery(form).serialize(),
      datatype: 'json',
      success: function (result) {
        console.log(result.status);
        var messagehtml = '';
        if(result.status == true){
          messagehtml = '<span style="color:green">'+result.message+'</span>';
        }else{
          messagehtml = '<span style="color:red">'+result.message+'</span>';
        }
        jQuery('#response_container').append(messagehtml);
      },
      error: function (error) {
        console.log("error");
        jQuery('#response_container').append('<span style="color:red">'+error+'</span>');
      }
    });
  });
</script>
and final output will be like this.

Still you can add styling to your form as per your requirements.
That’s it, You have successfully implemented shortcode with ajax submit and store it to database table. Here you can find full code in this GitHub repository.